This was a great year in skybow, a year in which we launched our online platform for rapid solutions development on top of SharePoint (which turned to be a great success), but it was also a year which drained a lot of my energy. I took the largest part of December out of work, to read, to recuperate, and to finally find time to finish my “surprising” pet project. Something that has finally nothing to do either with Office 365, Azure, or with software development.
I am not deeply into Internet of Things, not because I don’t find it interesting (I actually do!), but simply since most of these projects are for the sake of doing it, and not for being really useful in everyday life. Sure, I did quite some home-automation stuff, but I settled on proven technologies from Amazon (Alexa), Google Nest and Philips, with no or very little manual tinkering. That is, it was the case until this May, when I got a hold of an old Grundig Mandello e/St from 1969, which was a Grundig’s flagship media box from that time. It was the choice – either I will take care of it, or it will end in the garbage. Now we couldn’t let that happen, could we 🙂

After closer inspection it was clear that this beauty took more than a few bumps and improper handlings during it’s life. The case (plywood) was rotten on more than few places (the moisture effects were obvious) the metallic strips were rusted, buttons of push-switches were partly broken, the turn-table was broken beyond repair and, most of all, it smelled a bit too much on cigarette smoke.
That being said, the amp and the loudspeakers were still in great shape, and the sound was just amazing. Nothing beats that good, old, tubes-amp sound paired with decent loudspeakers. That needed to be saved. This meant that I had to get a new body for the heart of this baby, some serious rewiring and resoldering, and getting a new music source for it (an FM radio and a broken turntable were not a valid option anymore).

First thing first, I needed a diagram of this thing to know what is what. Since Grundig has changed quite some owners since 80ies, and lost some if its glory, I didn’t know if their current owners, Turkish consumer electronic concern beko would have, or would be ready to provide the CS200 wiring diagram used in Mandello e/St. Sending an email couldn’t harm anyone, and – yay! – I got all the diagrams (way more than I needed) the very same day! Kudos to Grundig and beko people, and a big thanks!

Now it was the time to open the case, to remove the turntable and those radio receivers that could be removed – all I needed is actually the amplifier and the loudspeakers.
The speaker foam was all dried and it was crumbling. I cleaned it properly, but it was obvious that a new speaker foam and new speaker grill fabric had to be purchased and used.

The amplifier has two 5-pole DIN inputs, originally used for radio and turntable. There were few push-buttons for switching between inputs, and adjusting knobs for balance, treble and volume (with 5-pin potentiometer).
So here was the master plan:
- Get a new case for the media box
- Use Raspberry Pi as a music source. Use HiFiBerry DAC as the soundcard.
- Use Raspberry Pi touch-screen for display on the front panel
- Re-solder everything to the new case
Getting the case
Luckily, my buddy Vahid, from Bosnian town of Konjic (where I grew up) is a carpenter. No, wrong, he’s a darn magician. I brought him photos and a bunch of ideas. After lot of thinking and brainstorming, we started coming up with some prototypes.

Vahid decided not to use plywood anymore, but the real walnut wood. We would made the case a bit smaller than the original one, since we wouldn’t need that large front panel with the name of the cities and radio stations – it should just be wide enough to hold Raspberry Pi screen, volume knob and the on/off switch. A week later, he was done with it. A magician, I tell you.
Getting the pie done
One that has been done, the next step was making this baby sing. For that, what I would need were a Raspberry Pie 3, a HiFiBerry DAC+ Pro sound card and a Raspberry Pi 7” touch screen. I was accompanied on a slow afternoon by @cosedola_f for some Raspberry Pi tinkering and soldering session.
Mounting the touch screen to the Raspberry Pi is a very simple procedure, described very well in the Touch Screen mounting guide. Basically, you need to connect the wide ribbon cable to the underside of the display board supplied. There is a delicate clamp you need to pull out slightly before sliding the ribbon in. Problem with RP 3 is that the SD card slot is right under that clamp. Since I knew I be changing SD Cards a lot later, I somehow had to provide an easy access to the SD Card slot. That’s why I bought a 60 cm SD extender cable (you can get it from various online shops) and inserted it to the Pi’s SD Card slot before attaching the screen. Both cables (screen cable and SD extender cable) need to be buckled a bit, but, hey, it works.
We powered the Pi, and everything was working. So far so good, the next step was connecting the HiFiBerry.

That procedure is nicely described in this tutorial. The main issue here is supplying all three devices with sufficient power. The previous tutorial describes the way how all three devices can get their power supply from the touch screen, but, regardless which cables and power supply we used (and we used the recommended ones!), Raspberry Pi screen was complaining that there wasn’t enough power. Since I knew that later on I’d be using L-shaped micro USB cables (since a normal cable wouldn’t fit in the front panel of the case), and I couldn’t, due to the limited choice, really rely on quality of these, I decided to supply both touchscreen and the Pi with the separate sources of energy (HiFiBerry is still getting its juice from the screen). I used Anker PowerPort I had, and suddenly I was blessed with 5 USB charging ports – I used one for Pi, and one for the screen. Actually, not a bad design, since I could (and would!) add more goodies later, so the power-supply problem was solved for good. It only meant that this thing whole will have to be packed into the wooden case, which is no problem, there is enough place for that. We turned the whole thing on, the screen was not complaining anymore, and the sound card was producing noise.
Very good.

The force awakens
OK, with raspberry set up, it was the time to put it all together. The biggest challenge was of course resoldering the whole thing. For example, the switch: the original Mandello e/St case had a switch glued to the body. There was a thread span from a push button to the switch, which was physically pulling the switch, when the push button was pressed. That solution could obviously not be repeated here. Plus, I wanted a proper, good looking switch, instead of that functional, but not particularly beautiful which we found inside the Grundig.
The second thing was the potentiometer. It was a 5-pin switch, which I wanted to reuse (I might replace it after all, more a bit more about it). I drilled the front plate and exposed it, and I attached the radio frequency adjusting knob to it, since it used the same shaped arm, and it just looked better. I fixed the bas, treble and balance knobs inside the body, and decided not to expose it to outside.
Furthermore, there was lot of cold joints on the amplifier board, which needed to be resoldered and rewired. I could not do this alone, my practical experience with this kind of boards and precision soldering were not on-pair with my wishes and theoretical knowledge. Luckily, electrical magician Pavle Kajganić, from Bosnian town of Doboj, was visiting @panjkov, and I shamelessly asked to use his brain and hands.

After few hours of removing cold joints, soldering, moving and re-soldering switch, we were ready. We soldered Anker’s USB charger power cable to the second power supply from the case, which was previously used to supply power for the turntable, so there would be no need for two power cables hanging out from the case, and both amplifier and the USB charger could be turned on with a single switch.

All that was left to do was to assemble everything together, and to take care of the last thing that remained to be done: software.
Powering up the engines
One of the main dilemmas was which software to booth on the Raspberry Pi. At the moment, my choice is Plex, but let me explain how did I come to that decision.
The first OS I installed was actually RetroPie, which can run Kodi Media Player in the Ports mode. I already have a full-blown RetroPie installation in my office, but I thought it might be fun running some of the games in the living room as well. Kodi has few nice advantages – you can send any audio or video (for example from YouTube) to Kodi player, from your mobile device with a simple “Send to Kodi” share action (which comes with the Kodi remote app). That is neat. Theoretically, you can also set it up as a Bluetooth receiver, but I didn’t do that since I use Amazon Echo Dot for that (a bit later about it). Touch screen commands work beautifully. And yes: RetroPie has silly old games!

Playing YouTube video on Kodi – Amira Medunjani, Bosnian jazz/world music artist
The main problem with Kodi on Raspberry Pi is that – it doesn’t really work. It would just freeze without any real reason. Or it would play music with interruptions and unwanted pauses. I first blamed it on my wireless (even if it is actually good), and connected the network cable – the same thing happened.

Playing Manic Miner on ZX Spextrum emulator
So, I tried to install LibreElec Kodi installation, the “official one” for Raspberry Pi, that one which can be found on Raspberry Pi official web site. After my first shock that it actually requires a 200 GB SD card (luckily, I had one), nothing changed – Kodi behaved very badly. Obviously, raspberry Pi is just not appropriate hardware for it. And with LibreElec, even the touch screen didn’t work (the touch part of it, that is – the screen itself worked). So, it’s a fair thing to say, that the RetroPie Ports Kodi version actually worked better than LibreElec.
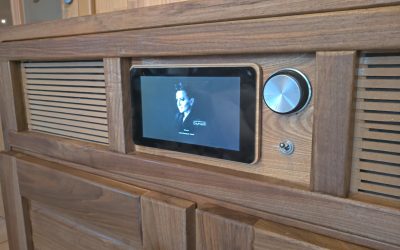
We have at home a functioning Plex system, which we use to manage and stream all our media. Plex has numerous advantages: it is stable, “it just works”, each device can control other devices, etc. I was a bit worried when I’ve noticed that RasPlex, the “semi-official” Plex client for Raspberry Pi is actually based on LibreElec (the one which worked *very* badly), but Plex proved itself a stable and working beast again.

Plex interface on Rasperry Pi
Plex has its disadvantages as well: it is a closed system, there is no supported way to play a YouTube audio or video through Plex, you need a server on backend or in the cloud (we had that, but for the people that don’t, it might be an overhead). Since it is based on LibreElec, the touch screen would not work. And I couldn’t play silly old games. But these were all secondary concerns: it could play music, and that was the only important thing.
Setting up the sound card
I just realized I skipped the whole sound card part here. The HiFiBerry is a solid little sound card, but Raspberry Pi does not know it natively, so you need to fiddle a bit, in order to make it work.
For Raspbian-based systems, such as RetroPie, the procedure is as following:
First, remove the following line from /boot/config.txt if it is there:
dtparam=audio=on
This removes the driver for the onboard sound.
Now, you will need to add the HiFiBerry driver to the device tree overly file. While you are still editing /boot/config.txt add the following line, depending on your HiFiBerry device:
- DAC for Raspberry Pi 1/DAC+ Light/DAC Zero/MiniAmp:
dtoverlay=hifiberry-dac
- DAC+ standard/pro:
dtoverlay=hifiberry-dacplus
- Digi/Digi+:
dtoverlay=hifiberry-digi
- Amp+:
dtoverlay=hifiberry-amp

Since LibreElec-based Raspberry Pi installations are quite different – you don’t get bash, and there is no device tree overly file in boot/config.txt, you will need to SSH to your Raspberry Pi. For RasPlex installations, the username/password are root/rasplex.
The config file you need is located at /flash/config.txt
Since you don’t get sudo there, and vi or nano won’t be able to save the read only /flash/config.txt file, you will need to change its permissions to read-write:
mount /flash -o remount,rw
Now you can edit the file:
vi /flash/config.txt
Once you are editing the file, do the following. First comment out the LIRC line you find there, since it is known to cause issues:
# dtoverlay=lirc-rpi
Then add (uncomment) any of the following lines, based on which HiFiBerry device you’ve got. In my case (DAC+ Pro device), I uncommented the corresponding line:
# Uncomment to enable HiFiBerry overlay

# NOTE: You must disable the lirc-rpi overlay (or change lirc GPIO pin) for HiFiBerry to work correctly

# dtoverlay=hifiberry-amp

dtoverlay=hifiberry-dacplus

# dtoverlay=hifiberry-digi
On the end, make the config.txt file read only again:
mount /flash -o remount,ro
Final touches and the next steps
I exposed the USB ports, HDMI and RJ45 (Lan) port from the Raspberry Pi on the back of my media box. Since I didn’t just want to drill a hole in it, I purchased on eBay a modular socket, mounted it on the back of my media box case, and connected it with appropriate cables to Raspberry Pi. It doesn’t even look that bad.

What I might, and eventually will do, is replace potentiometer. This one is 50 years old, and one can hear a low, but constant induction humming noise. While the most people who have heard it find it romantic and authentic (“it is just like with the old devices…”), it is actually just an old potentiometer and induction node. I will change that one.
On the end, I wanted to use my new media box with Amazon Echo Dot, and – eventually – yo use it as TV speakers (sounds better than any soundbar). The original Grundig amplifier has two inputs, but, a) I didn’t expose the input switch to the front panel, and b) I don’t want always to manually switch between Plex / Alexa / TV sound. So, the easiest way to overcome this was getting a small mixer. Behringer XENYX 302USB 5-Input Mixer was a good choice, since it is powered by 5V USB, and I had three more free USB slots in that Anker USB charger. Echo Dot took the fourth one, and the show was ready to start. Now I can use Echo Dot as a Bluetooth receiver, or to play music from my Spotify account to this media box, and of course to fool with Alexa (football results, fart sounds and home automation stuff). I could also use it as TV speakers if there is ever a need. But, what it is mainly used for, is playing our music collection through Plex, and playing some silly old Sinclair ZX Spectrum games. And it looks pretty good in the living room, as well.

Happy New Year to me!