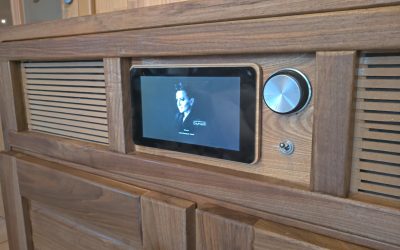
More than two years ago, I have wrote a blog post where I told the story of coming in possession of an old Grundig Mandello e/St music cabinet from the late 60s, and how did I repair / revitalize it to serve as a music device in Nubelus conference room.
The things were working really nice for some time. That beautiful old device, with a nice, warm sound coming from the old tubes-amp and old speakers, that was something really special. But, the fact that it was laying in a wet cellar for 2 decades, took its toll: first, the potentiometer started causing sound disturbances and ugly noise, first slightly, and then stronger and stronger, until it was at one point not bearable any more. Since those 5-poles potentiometers are not able to buy anymore, I have found an old-school electronic magician, who was ready to wind it again. And then it kind of worked (even if it was “stepping over” way too much when increasing and decreasing volume), and then two tubes died. That was the point where I had to decide if I am going to invest ever more money in repairing it, hoping that it would start working properly one day, or to make a clean cut and say goodbye to the amp. Even in 60ties, those amps in the music cabinets were never the “best ones”, it was a mass-produced radio and turntable for German families. Investing even more money did not seem as such a good idea.

Now, since the loudspeakers were still ok, since I still needed a music device for my office, and especially since my friend Vahid made a beautiful walnut-wood cabinet for that, I decided to keep the most of it, but to replace the amp with something fully digital.
Hello, BEOCREATE
I have had already had a good experience with the products of the Swiss company HiFiBerry, which specializes in development of audio components for embedded computers. I used their DAC+ Pro in the original Mandello setup, to bring the sound from Raspberry Pi to that old tubes amp. For Christmas, I have made a small “jukebox” for a good friend, using their MiniAMP. Recently, I have read that they have made a combined DSP/DAC/AMP board in cooperation with Bang and Olufsen, called BEOCREATE, for a pretty attractive price of under 160€. Knowing the quality of their previous boards, I have decided to try that. It was a sad moment to throw away the old tubes amp, but it was a time to give BEOCREATE a go.

Before I start, a few important observations: It is a great little board, definitely a winner in value-for-money reviews, but somewhat complex to set up. While there is theoretically documentation available on the HiFiBerry site, it is pretty scattered, inconsistent, and without any end-to-end guide how to set it up properly. While I am not sure I have understand everything about it (it is a board for audiophiles, with quite some options, and very little documentation), I will try to describe an end to end process here, for my future reference, and maybe someone else will also find it useful.
Next, the power supply does not come with the board. The reason for that is, that you can supply the power to it from the other components of your system (e.g. if you are using BEOCREATE in one of those “music lines” from 80s). But, if you are not doing so, you will need to purchase a power supply separately. I have used MeanWell GST60A18-P1J, which works quite nice.
Last, It is important to understand that BEOCREATE can work without Raspberry Pi, as a standalone amp. But even so, you will need a Raspberry Pi to first set it up (to write a DSP program/filter on the board). At least I couldn’t figure out any other way to do that without a Pi.
Connecting BEOCREATE to Raspberry Pi
Connecting BEOCREATE to Raspberry Pi is as simple as it goes: stick Pi’s GPIO pins into BEOCREATE, and it will work. However, both boards together looked a little clumsy, plus I knew that I will be attaching an official Raspberry Pi screen to the whole setup, so I have decided to use a GPIO Extension cable with 40 pins. That way, I could have the both boards separated, and easily accessible on the board.
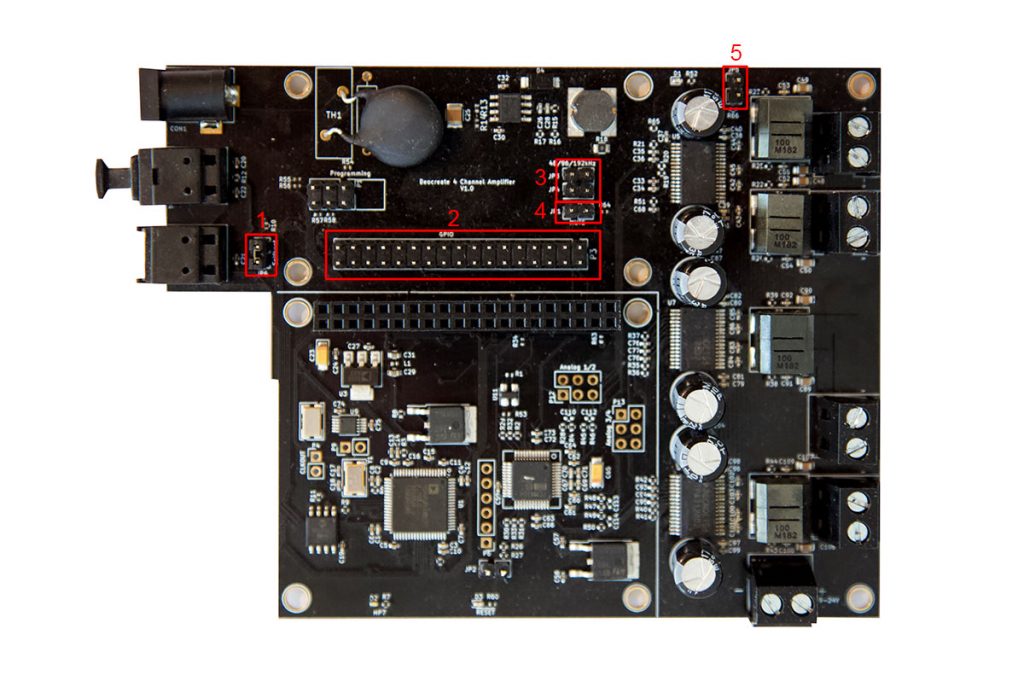
IMPORTANT: Remove the “mute jumper” on “4” on the scheme above. If you don’t , you will never be able to hear any tone from the amp 🙂
Jumper “1” should almost always be present, since it tells the board to autoload DSP programs. You will want to remove this only if you want to program DSP filter with your own tools.
Jumpers marked as “3” in the schema above define the internal sample rate. The official documentation says “If you want to design your own DSP program that runs at higher sample rates, this jumper has to be set. This is only for very advanced users. Changing the sample rate of the DSP will require a lot of changes in the provides sample project!” Right. Even if I had a R-Pi 4 dedicated for this purpose, and I would like to use sample rates higher than 48 kHz, I didn’t dare to touch anything here – there is simply no documentation what should be done, and how should it be done.
Hey HiFiBerry guys: if you read this, please, pretty please, document the whole part about DSP programs and sample rates a bit better. Whole this part of documentation is “you could”, “there is a possibility”, and “here are 42 ways how to make a DSP program for your BEOCREATE”. I am a software developer, and audiophile with not inconsiderable knowledge about audio and electronic equipment, I know what DSP filters are, but I just gave up on this. You have a great board here, but lack of documentation and, foremost, inconsistent documentation is not making this easy 🙂
Since BEOCREATE will take all of your Pi’s GPIO pins, it is only fair to return some of those pins back to the other devices that should possibly connect to it. That is the part “2” marked on the schema above. The functionality of those pins can be found here: https://www.hifiberry.com/beocreate/beocreate-doc/beocreate-gpios/
Connecting BEOCREATE to the outside world

As I mentioned before, I have used an external power supply to juice both BEOCREATE and Raspberry Pi (Raspberry Pi is getting power through the GPIO pin connections). On the schema above, it is position “1”. Please note that you can also supply power directly (screw terminal), 2 – 20V, through the position “4” on the schema above. You cannot use both 1 and 4, it has to be one of both.
You have also got Toslink In (e.g. connecting the Google cast to the board), position 2 on the schema, and Toslink out (position 3). You will connect your speakers either to channels 1 and 0 (30 W) or to channels 16 and 17 (60W), which largely depends on the speakers you will be using. I went with 16 and 17.
And that’s it about the hardware part, let’s see next how to power this all up.
Powering it up: HiFiBerryOS, a hidden gem with three major flaws
In order to make the BEOCREATE board work, you need to upload a DSP program to it. Otherwise, you will not be getting much out of it. I am again back to ranting about HiFiBerry’s documentation here: you will be hearing words like DSP toolset, Bang and Olufsen’s Sigma Studio, and a gazillion of other buzzwords, which will make you desparate. It took me some time to realize that it is all irrelevant, and that it can be done with HiFiBerryOS.
After I have installed it (it is a very simple wizard-like process, there is really no need to describe that in detail), it took me a moment to realize how good that OS actually is. It has two major functions: to set up your BEOCREATE board properly (to write a DSP program to it), and to turn the Raspberry Pi which is attached to the BEOCREATE into a nearly perfect streaming box.
It is actually almost perfect. That is, if you didn’t have a few extra requirements which I had.

I have been talking to lot of people in-person how there was (until recently) no *really* good and stable media player software for Raspberry Pi. Well, welcome HiFiBerry OS: it is a MPD-based uPnP/DLNA, AirPlay, Bluetooth, Spotify Connect, Squeezelite, Rune and Radio streamer! The music library in our home is organized in a uPnP library, so that was our main criteria. We also have Spotify subscription, we listen to radio, and rarely, very rarely, we also use Bluetooth. I need to especially praise the shear number of radio stations: all major stations allover the world, all “niche stations” for special music genres, and even the local stations (yap, the local radio station from a 20000 soul small Bosnian city where I grew up was also there). Chapeau, HiFiBerry, awesomely done.


It was finally time to get some sound out of all of this 🙂 I have played me some Quincy Jones “Live in Ludwigshafen”, and man, it sounded really, really good. Now, it is not the “tubes amp sound” that it was there before, and I also wasn’t expecting it, but it was crystal clear and sharp, yet pleasant. You have a feeling that you can hear every instrument separately.
BEOCREATE sounds really good, even “out of the box” (without fiddling with DSP filters), especially considering that it is a 160€ device. I was very positively surprised by the sound, both on my test loud speakers (cheap Polks), and on the loudspeakers which were built into Grundig Mandello e/St (much better :). If you have any doubts about quality of this board, set them away. Of course, you need to consider what this board is meant to be, and which devices it is meant to power. You should not be comparing it with 4-digits priced amps. But, that what it is supposed to do, it does very, very well.
No, I am neither affiliated with HiFiBerry, nor paid by them, nor I have any other benefits from them. I paid for my BEOCREATE card with my own money 🙂
Back to HiFiBerryOS.
So, if the OS is that good, what is missing, then? Not much, and probably this is not going to bother a vast majority of people, but it was crucial for my me for two reasons.
The first is the UI: unfortunately, there is none. When you stream something to Raspberry Pi with HiFiBerryOS, the screen attached to that PI will just display the HiFiBerryOS logo. OK, I get it, this whole thing is meant to be hidden into an old Bang and Olufsen speaker, or an old music line, but I already have a built in screen in my media cabinet. Is it really that difficult to put up a HTML page with “Playing now”, and to display it on the screen?

The second problem with HiFiBerryOS is, it does not support the local data sources. You might think why is that needed at all, but just think of all the “Modern JukeBox” scenarios. I have a side project of building a JukeBox for my friend, and I was first delighted with everything I’ve seen with HiFiBerryOS and then had to sadly realize that such a simple thing, such as local data source, is not supported.
The third and the last problem is, it doesn’t register as Google Cast / Chromecast device. I am personally not using it, but a friend has decided not to go for HiFiBerryOS / BEOCREATE for this very reason. Google has some quite hood APIs for this, and that makes it difficult to explain why that is not supported.
Using HiFiBerryOS to store DSP filters on the BEOCREATE
So, even if I couldn’t use HiFiBerryOS for my media cabinet due to the reasons mentioned above, I was still pretty impressed by it. If those three things mentioned above don’t bother you, and HiFiBerryOS is feature-wise what you are looking for, don’t look further.
I had to look further though, but I needed HiFiBerryOS to store my DSP profile on the BEOCREATE, so that it can work without it.


As I wrote before, BEOCREATE is a really good board, which let you create DSP filters and profiles as you want. Lot of that is badly documented piece of technology, but, for example, in the menus “sound design” and “measurement” you can play with your speakers and optimize the sound for them, and even measure the sound and make the profiles based on the measurement. Once you are satisfied with the sound, make sure to remove the volume limits, and to save that profile to the BEOCREATE board. You *must* set the options from the screenshots above. All of that is available under the “SOUND” menu in the HiFiBerryOS.
Once you are done with that, you can use your BEOCREATE card with any other OS / media player.
Hello Moode, my old friend
I have been monitoring the development of Moode Audio for quite some time now, it was always looking as a promising project, which had some children diseases. Similar to HiFiBerryOS, it is based on MPD server. Well, the child grew up, and Moode Audio has in the meantime become a rock solid media system for Raspberry Pi. My main concern was how would it work with BEOCREATE board, since I was reading from the other people, that they were using HiFiBerry DAC+ audio profiles to work with BEOCREATE.
But nope, not needed at all: Moode recognizes BEOCREATE natively in the new versions. No need to fiddle manually with the config files, or anything. Similar to HiFiBerryOS, Moode will work well with UPnP/DLNA, Apple Airplay, Bluetooth, Spotify, and Squeezelite. It will also support local music files, which you can save on the RaspberryPi’s SD Card. Again, no Google Chromecast, but that was never my requirement in the first place 🙂
By default, Moode also doesn’t have an UI, but it can be turned on. Now, that UI is not really touch friendly, and it is very difficult to control music from that UI, and that might easily be my largest and the only issue with Moode. Both, on the smartphone, and on the display attached to Raspberry Pi, the elements (songs, artists, albums) are too small to use, and it hurts that the default action is “queue”, and not “play”.
But, OK. I have not planned to use the Moode UI to control music anyways. I will be using the other apps to stream to Moode. I just need it to display *what* is playing.

And that scenario works like charm. That moment when you play a song over uPnP (use any uPnP player, for any OS), album art is shown on the display, with all the music metadata. It works similarly for radio stations (all of them emit metadata, which Moode can show). Spotify Connect shows only the Spotify logo when streaming, but that is something I can live with.
What are the drawbacks of this approach with Moode audio? There are none, really. Moode is very stable, it works now for over a week without restart, or hiccups of any kind. It pays off to use the rock-solid MPD in the background. When used with uPnP (and that is what we are using it with in 80% of the cases) it works beautifully, plays without interruptions, shows music metadata and album covers, and everything else that you would expect from a good music player. Well done.

There is one more thing: programming a rotary knob to work with this complete setup and with Moode Audio. But that is not really connected wither with BEOCREATE or Moode, and it can really be used for anything else. For thatr reason, I will leave that for a separate blog post.
Stay safe during this pandemic times, and enjoy music!