
Traditional SharePoint developers knew very well how to handle daemons in their daily work: Timer Jobs were the way to go. Microsoft was very specific in their guidance and documentation. We used (and sometimes misused!), Timer Jobs for all different sort of situations – from cleanup jobs, async data manipulation (sic!), to getting external data into the SharePoint context. Even with all the problems that timer jobs had, we learned to live with it, and to use them to our advantage.
The situation got somewhat more complex with the transition to cloud, and to client-side development. First of all, there was no “official way” how to do it anymore, as in the “good ol’ times”. The new Microsoft is all about “here is the API, you use whatever tech you want” mantra. Which can be good (freedom!), and bad (bad architectural decisions!) in the same time. The trending technology was also changing over the past two or three years. Three years ago, my answer on “how do you develop daemons for SharePoint Online” would probably be “Azure WebJobs”. Now, we have even more options. In this article, I’ll fully go the “serverless” way, and explain how to use Azure Functions for these purposes (because Functions run on hamsters, and not on servers).
Why Functions? Because they will do the job just fine for the light-weight and short running pieces of code, which is very often the case with timer jobs. For anything more complex, using Azure WebJobs is still a legitimate option.
Who are you, and when yes, how much?
That question from the subtitle is the first question we need to answer. It is not a new question, but it was, in the “good ol’ times”, answered for us. SharePoint Timer Jobs would run under whatever service account that was running OWSTIMER.EXE Windows service, and sharepoint\system would be used to access the data. Why was it like that? It is really, easy: you don’t have a “real” user when running a daemon, nobody has authenticated against the IIS. It is a background process that does stuff, and you shouldn’t use a “real” user’s account for that purpose. Therefore, we used the service accounts.
The same is true for SharePoint Online and Azure world. For daemons, we will need to authenticate our code with a non-personal identity, just like we did before. It’s called “app only” nowadays.
So how do we do that? In SharePoint Online and Azure world, it is Azure Active Directory (AAD) what we need. If you still didn’t learn it, it’s time for you to do it: it is probably one of the most important pieces of today’s technology for developers on Microsoft platform. We will create an AAD -secured application, to wrap our code into, and set the necessary permissions for it.
The first step is to log into the Azure Portal – “Azure Active Directory” Management, and to “register” a new web application as “Web app / API” through that portal.

Next, we need to assign the Application permissions we need on SharePoint Online and/or Microsoft Graph APIs (or any other standard or custom API you might have available).
When we choose an API, we need to give it permissions. We have two types of those: Delegated permissions, with full impersonification, where user’s identity is required and passed on, and Application Permissions, where user’s identity is neither required nor needed, and where we want our “App” being the principal to make the changes.
We should leave delegated permissions empty here, since we are developing a daemon, and therefore we don’t know anything about the user. We will go to Application Permissions, and click the appropriate checkboxes, depending on what our “timer job” will have to do.

If you are familiar with AAD applications, you know that securing them works on a well-known public/secret keys principle. For each application that you register with the AAD, you will generate a Client ID, which serves as a public key (you don’t have to worry about losing that one), and the set of secret keys, which you need to keep – well, secret.
For using our newly created application for Azure Functions, however, this will not be enough. We are not going to use the secret keys, but certificates, in order to make this application really authenticate our Azure Function against SharePoint. In production, we are probably going to purchase a certificate from a relevant certificate authority, but for this test, a self-created one is going to do.
In order to do that, you will need to create a certificate on your machine (in Windows, using the Management Console or PowerShell), and to export it as a X.509 certificate (usually with .CER extension) and the private key (usually with .PFX extension). Once you have the CER and PFX files on your computer, run the following PowerShell script to extract the base64 representation, certificate key, and certificate hash from the X.509 certificate (.cer file), since we are going to need them later.
$certPath = "X:\\[path]\\[certificatenname].cer"
$cert = New-Object System.Security.Cryptography.X509Certificates.X509Certificate2
$cert.Import($certPath)
$rawCert = $cert.GetRawCertData()
$base64Cert = [System.Convert]::ToBase64String($rawCert)
$rawCertHash = $cert.GetCertHash()
$base64CertHash = [System.Convert]::ToBase64String($rawCertHash)
$KeyId = [System.Guid]::NewGuid().ToString()
Write-Output "Base 64 Certificate"
Write-Output $base64Cert
Write-Output "Base 64 Certificate Hash"
Write-Output $base64CertHash
Write-Output "Key ID"
Write-Output $KeyId
The output from this PowerShell will look something like this:
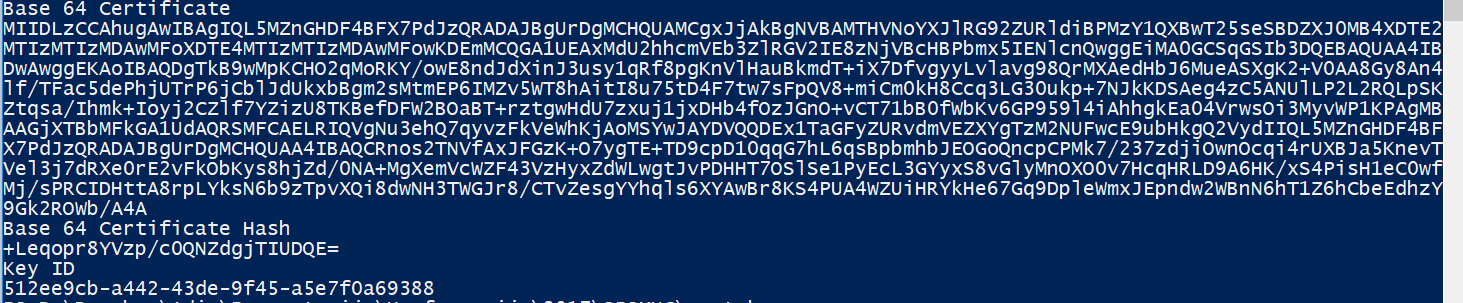
You should save these values, since we are going to need them later.
Next, we need to go back to our AAD Application, and to enter this value in the application manifest. Click on the “Manifest” icon in the application properties, and the manifest editor will open. Look for the “keyCredentials” section in the manifest – it should be empty. Insert the following values into it, so that it looks like this:
"keyCredentials": [
{
"customKeyIdentifier": "[enter certificate hash here]",
"startDate": "[certificate start date]",
"endDate": "[certificate end date]",
"keyId": "[enter certificate key id here]",
"type": "AsymmetricX509Cert",
"usage": "Verify",
"value": null
}
]
Please save the manifest. It should look something like this:

Once we are done with this, we can move on to creating our Azure Function, which will serve as a timer job.
Creating an Azure Function and connecting it to SharePoint
First, create a new, empty Azure Function from the Azure Portal. In my case, I will choose a HTTP triggered C# function, but you can choose any other language you feel comfortable with. HTTP trigger means that we are going to invoke our function manually, through HTTP operations, so we can easier test the function. This will be changed later on, in order to use timer triggers.
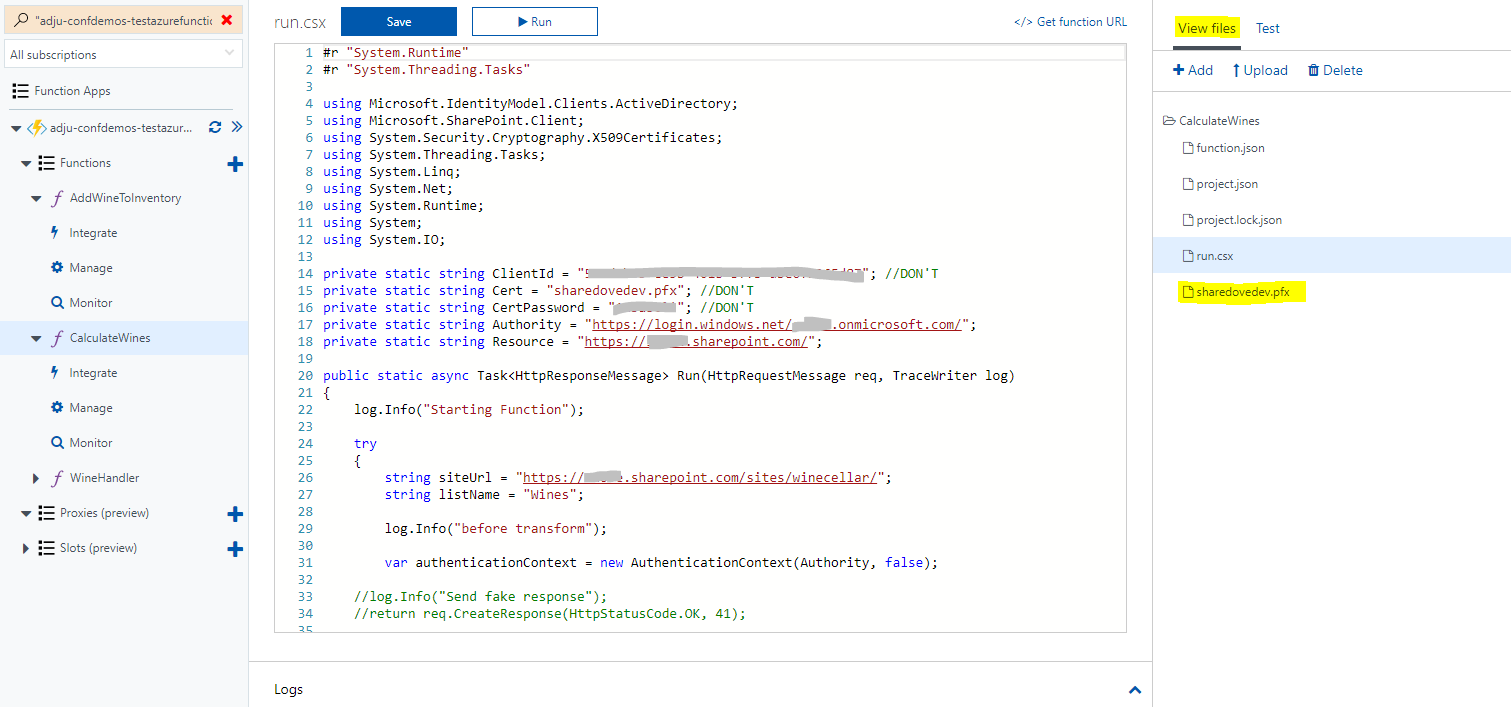
The first step you need to do is to upload the private key (PFX) to the files section of your certificate:
Once you are done with that, let’s start developing the function. The first thing you will need to do, is to set the dependencies. For C#, you will need to open project.json file, and to add the references to
• Microsoft.IdentityModel.Clients.ActiveDirectory
• Microsoft.SharePointOnline.CSOM
During the background compilation of this function, Nuget packages of the above-mentioned dependencies are going to be retrieved, and the references are going to be resolved properly. I used the CSOM here, depending on APIs and libraries you want to use, you might want to reference something additional or something else.
In my case, project.json looks something like this:
{
"frameworks": {
"net46":{
"dependencies": {
"Microsoft.IdentityModel.Clients.ActiveDirectory" : "3.13.7.964",
"Microsoft.SharePointOnline.CSOM": "16.1.5813.1200"
}
}
}
}
Now let’s look at the function code itself (run.csx).
We will first need to declare some environment variables:
private static string ClientId = "AAD app client id";
private static string Cert = "sharedovedev.pfx";
private static string CertPassword = "pass@word1";
private static string Authority = "https://login.windows.net/[yourtenant].onmicrosoft.com/";
private static string Resource = "https:// [yourtenant].sharepoint.com/";
string siteUrl = "https://[yourtenant].sharepoint.com/sites/[yoursite]/";
string listName = "[listname]";
Most of these are self-explaining. Use the password that you have set during the certificate creation. Change the authority and resource to include your tenant urls.
Important note here: don’t store your certificate passwords in the clear text in the function, there are other ways, such as Azure Key Vault, how to do that properly.
In the Run method itself, we will first need to get the authentication token from the certificate:
//create AuthenticationContext
var authenticationContext = new AuthenticationContext(Authority, false);

//read the certificate private key (PFX) as byte array
var certPath = Path.Combine(Environment.GetEnvironmentVariable("HOME"), "site\\wwwroot\\[yourdirectory]\\", Cert);
byte[] certbytes = System.IO.File.ReadAllBytes(certPath);

//create X.509 certificate object out of the byte array
var cert = new X509Certificate2(certbytes,
CertPassword,
X509KeyStorageFlags.Exportable |
X509KeyStorageFlags.MachineKeySet |
X509KeyStorageFlags.PersistKeySet);

//get the auth token out of that certificate
var authenticationResult =
await authenticationContext.AcquireTokenAsync(Resource, new ClientAssertionCertificate(ClientId, cert));

var token = authenticationResult.AccessToken;
With this, the most important thing has been done: we have got our access token, which we can use for the calls against our APIs, in this case, against SharePoint Online.
In order to do that, we need to attach this token to every call we make against SP Online.
//create a ClientContext, and attach the auth token
//to the header of each request we are going to make.
var context = new ClientContext(siteUrl);
context.ExecutingWebRequest += (s, e) =>
{
e.WebRequestExecutor.RequestHeaders["Authorization"] = "Bearer " + authenticationResult.AccessToken;
};

//now finally we are ready to do
//some SharePoint magic with the CSOM here
context.Load(context.Site);
context.ExecuteQuery();
Web web = context.Web;
What did we do here? After we’ve got the token, we have created a SharePoint ClientContext, and attached the auth token to each request we are going to make to the server. That way our auth token is always going to travel along.
The full code of run.csx can be found here – please use it just as an example, it is neither clean, nor did I follow the coding best practices here (clear text passwords!). You will, however, get the idea how the things work from there: https://goo.gl/M5hu22
My code actually adds some items into a SharePoint list. If you open the list items which have been added by this Azure Function, you will see that the Author and Modified By fields are properly set to the principal which nicely identifies as our AAD App:

Creating the timer job from Azure Function
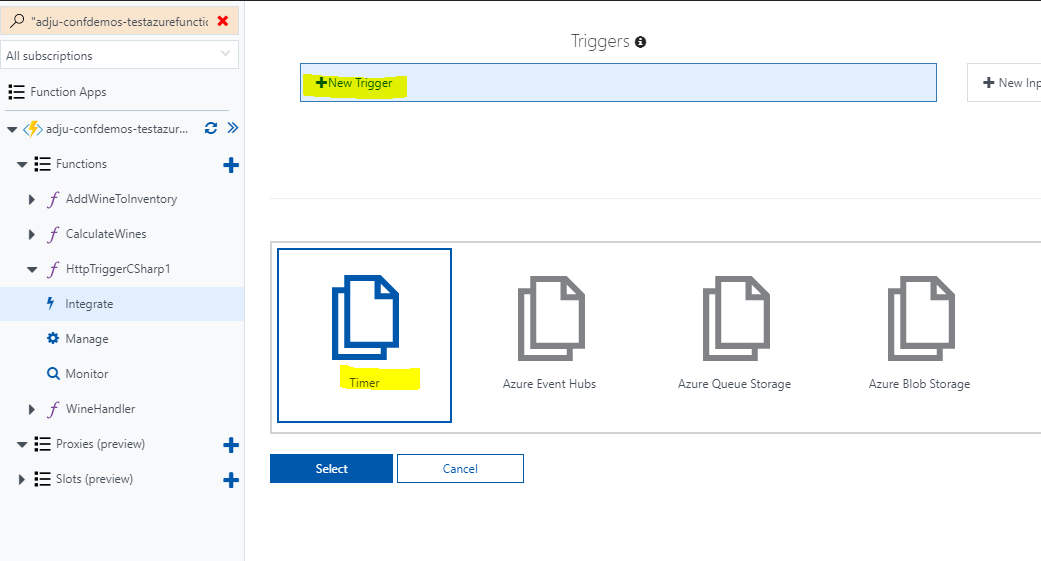
The last step will be to change the trigger of our Azure Function from HTTP to Timer. Open the “Integrate” tab of the function, and delete the existing HTTP trigger:

Then click on the “New Trigger” button, and select the “Timer”:
In the last step, you will have to setup the schedule, and save the function.
When setting up the schedule, the basic format of the CRON expressions in Azure is consisted of 6 positions (placeholders), representing respectively:
{second} {minute} {hour} {day} {month} {day of the week}
For example, the following value would make timer execute every minute, on the second zero:
0 * * * * *
Note: examples below are overtaken from Armin Reiter’s blog post “Azure Fuctions Time trigger cheat sheet” (https://codehollow.com/2017/02/azure-functions-time-trigger-cron-cheat-sheet/) for the purpose of easier and compact reading. For way more information about setting time triggers in Functions, please visit the Armin’s original blog post.
The following values are allowed for the different positions (placeholders):
| Position | Placeholder | Allowed Values | Note |
|---|---|---|---|
| 1 | {second} | 0-59; * | {second} when the trigger will be fired |
| 2 | {minute} | 0-59; * | {minute} when the trigger will be fired |
| 3 | {hour} | 1-23; * | {hour} when the trigger will be fired |
| 4 | {day} | 1-31; * | {day} when the trigger will be fired |
| 5 | {month} | 1-12; * | {month} when the trigger will be fired |
| 6 | {day of the week} | 0-6; MON-SUN; * | {day of the week} when the trigger will be fired |
As we see, the values in the table above are flexible enough that we can define and set all the time intervals we would like. Here are just some examples:
| Expression | Description | runs at |
|---|---|---|
| 0 * * * * * | every minute | 09:00:00; 09:01:00; 09:02:00; … 10:00:00 |
| 0 */5 * * * * | every 5 minutes | 09:00:00; 09:05:00 |
| 0 0 * * * * | every hour (hourly) | 09:00:00; 10:00:00; 11:00:00 |
| 0 0 */6 * * * | every 6 hours | 06:00:00; 12:00:00; 18:00:00; 00:00:00 |
| 0 0 8-18 * * * | every hour between 8-18 | 08:00:00; 09:00:00; … 18:00:00; 08:00:00 |
| 0 0 0 * * * | every day (daily) | Oct 16, 2017 00:00:00; Oct 17, 2017 00:00:00 |
| 0 0 10 * * * | every day at 10:00:00 | Oct 16, 2017 10:00:00; Oct 17, 2017 10:00:00 |
| 0 0 * * * 1-5 | every hour on workdays | Oct 13 (FRI), 2017 22:00:00; Oct 13 (FRI), 2017 23:00:00; Oct 16 (MON), 2017 00:00:00 |
| 0 0 0 * * 0 | every sunday (weekly) | Oct 15 (SUN), 2017 00:00:00; Oct 15 (SUN), 2017 00:00:00 |
| 0 0 9 * * MON | every monday at 09:00:00 | Oct 16 (MON), 2017 09:00:00; Oct 16 (MON), 2017 09:00:00 |
| 0 0 0 1 * * | every 1st of month (monthly) | Oct 1, 2017 00:00:00; Nov 1, 2017 00:00:00; Dec 1, 2017 00:00:00 |
| 0 0 0 1 1 * | every 1st of january (yearly) | Jan 1, 2018 00:00:00; Jan 1, 2018 00:00:00; Jan 1, 2019 00:00:00 |
| 0 0 * * * SUN | every hour on sunday | Oct 15 (SUN), 2017 23:00:00; Oct 22 (SUN), 2017 00:00:00; Oct 22 (SUN), 2017 01:00:00 |
| 0 0 0 * * SAT,SUN | every saturday and sunday | Oct 15 (SUN), 2017 00:00:00; Oct 21 (SAT) 00:00:00; Oct 22 (SUN), 2017 00:00:00 |
| 0 0 0 * * 6,0 | every saturday and sunday | Oct 15 (SUN), 2017 00:00:00; Oct 21 (SAT) 00:00:00; Oct 22 (SUN), 2017 00:00:00 |
| 0 0 0 1-7 * SUN | every first sunday of the month at 00:00:00 | Oct 1 (SUN), 2017 00:00:00; Nov 5 (SUN), 2017 00:00:00 |
| 11 5 23 * * * | daily at 23:05:11 | Oct 16, 2017 23:05:11; Oct 17, 2017 23:05:11 |
| 30 5 /6 * * * | every 6 hours at 5 minutes and 30 seconds | 06:05:30; 12:05:30; 18:05:30; 00:05:30 |
| */15 * * * * * | every 15 seconds | 09:00:15; 09:00:30; … 09:03:30; 09:03:45; 09:04:00 |
For more info about the Azure Function intervals, please take a look at Armin Reiter’s blog post: https://codehollow.com/2017/02/azure-functions-time-trigger-cron-cheat-sheet/.
Conclusion
Executing daemon again SharePoint data, and performing actions in time intervals, was requirement in almost all medium and large SharePoint projects. With SharePoint server (on premises), we have SharePoint timer jobs, which do this task just fine. In SharePoint Online, however, we need to delegate this logic to some external system. Azure App Service, in all different flavors, is actually a legitimate way to do this, and Azure Functions (which are based on the Azure App Service) offer a nice gateway to do this. Especially if the code which needs to be run is a fairly simple and short, there is really no good reason against using the functions. One might argue that the development story around functions is not yet very mature, with all the issues with debugging, lifecycle etc, that long running operations are not really supported on the dynamic pricing plan (5 minutes timeout), and all those arguments stand. However, for simple operations, for simple code blocks, Azure Functions will do just fine as timer jobs replacement.